For Diesel models only
 |
 |
= |
Plug indicator light (see below). |
 |
= |
Idling adjustor (Twist button, see below). |
 |
= |
Plug starter switch (see below). |
|
|
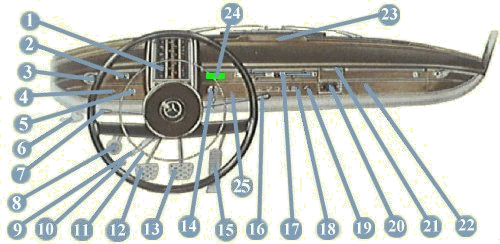
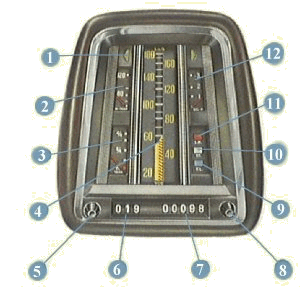
The instrument cluster (no. 1).
This instrument cluster was exactly the same for all the Heckflossen apart from the scale
on the speedometer.
- On the 190, 190D, 200, 200D and 220 the scale went up
to 160 km/h.
- On the 220S, 220SE, 230 and 230S; the scale went up to 180
km/h.
- On the 300SE and 300SE LWB; the scale went up to 220 km/h.
The cluster might have been clear and practical, it was not universally liked amongst
the drivers. In the end, it turned out to be nothing more than a fashionable whim and was
never seen again on the other Mercedes models. |
 |
 |
= |
Direction signal control lights - green, left and right. |
 |
= |
Telethermometer for cooling water; red mark: permissible max.
temperature. |
 |
= |
Fuel gauge. R and red warning lights: fuel reserve for approx. 30-35 km. |
 |
= |
Speedometer indicator, from 0 till 50 km/h: yellow, between 50 and 60
km/h: red-yellow, above 60: red. |
 |
= |
Reset knob for trip mileage. |
 |
= |
Trip mileage counter. |
 |
= |
Total mileage counter. |
 |
= |
Control button for instrument lights. |
 |
= |
High beam indicator light: blue. |
 |
= |
Handbrake warning light and combined choke warning light for models with
a choke: white. |
 |
= |
Generator indicator: red. |
 |
= |
Oil pressure gauge. |
|
|
Switch for the dome light (no. 2).
The cheaper models didn't have this switch which also served as an entrance light. It is
switched on or over, by means of a screen covering the light.
Screen closed: light off.
Screen half open: entrance light, switched on and off by door contact switch on
both front doors.
Screen fully open: reading light, with light switched on constantly.
|
Pull switch for windshield wipers (no. 4):
There are two stages:
Stage 1: slow movement of the wipers.
Stage 2: fast movement of the wipers. |
The light switch (no. 5).
A turn and pull switch. 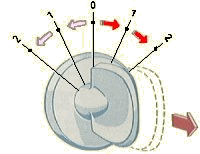
* 0-position= Lights off.
Clockwise from 0:
* 1st stop= Parking light, tail light, identification and instrument light.
* 2st stop= In addition, high and low beam (operation by foot dimmer switch no. 10).
Pulled out:
* at 1st or 2nd stop= In addition, fog lights.
Counterclockwise from 0:
* 1st stop= Clearance lights right.
* 2nd stop= Clearance lights left.
Other consumers can be operated independent of the light switch as soon as the ignition is
switched on. |
Toggle lever for engine hood lock (no. 6).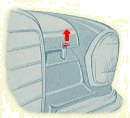
Open hood= Pull the lever. The engine hood which is firmly connected with the
radiator grille will then open a little up to the catch on the securing hook. Take hold of
the engine hood behind the ornamental molding on the left-hand side (seen in driving
direction), press the plate on the locking hook upwards and lift the engine hood.
Closing hood= Press the engine hood down firmly. |
The lever for blinker direction lights and flasher (no. 7).
Before 1965
Turning clockwise: direction signal light, right.
Turning counterclockwise: direction signal light, left.
Returns automatically to initial position when steering wheel is in 'straight-ahead'
position.
Moving up and down: passing signal light (flasher (only European design)): high
beam is on as long as lever is raised.
After 1965

Pushing down until it engages (1): high beam.
Lifting (2): passing signal light, high beam lights up as long as lever is lifted.
Swiveling in clockwise direction (3 or 3a): direction signals, right.
Swiveling in counter-clockwise direction (4 or 4a): direction signals, left. |
Foot pump for windshield washer (no. 8).
Step on pedal until resistance is felt: windshield wipers only.
Step on pedal beyond resistance: windshield washer will start. |
The foot dimmer switch (no. 10).
This was not found on second generation models. Instead, the lever for blinker direction
lights and flasher (no. 7) received an extra function (see above). |
The horn ring (no. 11).
The horn ring was later replaced by one that was squared of at the top for better
visibility on the instrument cluster. The horn is operated by pushing the ring forward. |
Steering lock with ignition and starter switch (no. 14).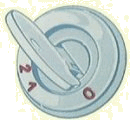
This combines ingintion switch, starter switch and steering column lock. There are 4
positions:
* 0 (Zero position)= Ingintion turned off, steering gear locked with key pulled
out.
* 1 (Parking position)= Key can be pulled out, ingintion is switched off, steering
gear unlocked.
* 2 (Driving position)= Key cannot be removed, ignition is switched on, steering
gear unlocked.
* Starting= Turn key in clockwise direction against slight pressure up to stop. As
long as the key is held against stop the starter motor will run. When released, the key
returns automatically to position 2. Prior to repeating starting operation, return key at
least to position 1. |
The gear shift lever (no. 16).
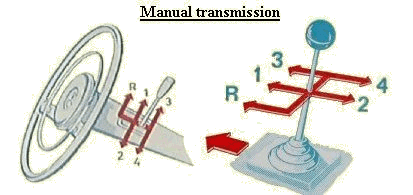 Standard,
the gear shift lever was mounted on the steering column but one could have a more
'sporting' gear-lever placed on the floor as an extra.
The transmission has baulked synchronish in the forward gears.
When shifting in reverse, a spring resistance must be overcome. |
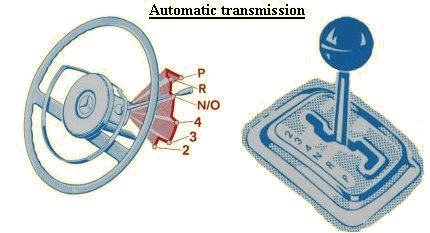 Cars with automatic
transmission usually had their gear-levers mounted on the column. Later second generation
models could be ordered with a floor mounted gear-lever. Early models have a 'O' for
neutral, later cars have a 'N'. Cars with automatic
transmission usually had their gear-levers mounted on the column. Later second generation
models could be ordered with a floor mounted gear-lever. Early models have a 'O' for
neutral, later cars have a 'N'.
The floor mounted gear-lever has a somewhat unusual shifting pattern: the lowest gear (2)
is placed at the top while the parking (P) gear is placed at the bottom. A modern
automatic transmission shifting pattern has its parking gear at the top and the lowest
gear at the bottom.
|
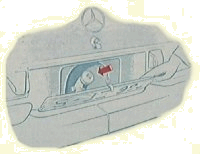
| The cars with automatic transmissions also had a panel, here
shown below, mounted on the dashboard (see The dashboard, no. 24) |
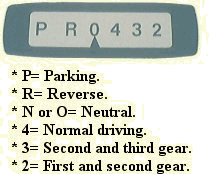 Mercedes-Benz
handed out a special brochure to customers on how to operate the automatic transmission.
The working of the transmission is just the same as the modern ones today. Having four
gears was a novelty for its time, many cars only had three gears. With the selector in
position 4 or 3, the car would start in second gear. Only when the selector was put in
position 2 would the first gear would be engaged. When driving away using full
acceleration, the transmission would 'kick-down' and therefore first gear could be used.
The driver had to push down the accelerator pedal beyond the full throttle position. Mercedes-Benz
handed out a special brochure to customers on how to operate the automatic transmission.
The working of the transmission is just the same as the modern ones today. Having four
gears was a novelty for its time, many cars only had three gears. With the selector in
position 4 or 3, the car would start in second gear. Only when the selector was put in
position 2 would the first gear would be engaged. When driving away using full
acceleration, the transmission would 'kick-down' and therefore first gear could be used.
The driver had to push down the accelerator pedal beyond the full throttle position.
|
|
Heating and ventilation (no. 17).
Fresh air is taken in through an opening in the front of the windshield and is cleaned by
a filter.
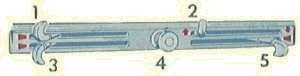 The quantity of air can be regulated by the air
control lever (1) and can be also be switched off completely if offensive odors are
entering. The quantity of air can be regulated by the air
control lever (1) and can be also be switched off completely if offensive odors are
entering.
If the quantity of air is not sufficient when you're driving slowly, the blower could be
switched on in addition. A control light in the blower switch (4) lights up while
this is in operation. The output of the blower can be gradually increased by turning the
switch clockwise until it catches; a still greater increase can be obtained by pressing
the switch beyond the catch.
With the air distribution lever (2) the required quantity of air can be distributed
freely between windshield, side windows and legroom while the rear is constantly supplied
with air.
The heating can be switched on freely - for left and right side seperately - by sliding
the heating levers (3 and 5).
|
Choke, only needed when starting a cold engine (no. 25).
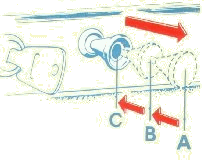 |
Pull out choke completely (position A) - the white control light in
the instrument cluster lights up.
Turn ignition key from position 2 to the right as far as it will go.
Do not release the ignition key until the engine fires regulalry. Do not actuate the
accelerator pedal.
If the engine did not fire after approx. 10 seconds, stop the starting procedure and turn
ignition key back to position 1 or 0. Repeat the starting procedure after a period of at
least 30 seconds. During the warm season press back the choke to stop B before starting
again and slowly floor the accelerator pedal during the strating procedure.
After the engine has fired, the choke should be pressed back towards
B as long as the engine runs smoothly and does not stop. Only at low outside temperature
the choke may remain in position A for a short time after the engine has fired.
When the engine is warmed up, press back the choke to the stop
position (C); the white control light will go out.
|
|
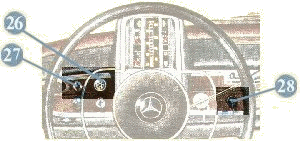
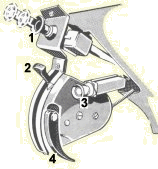
Plug indocator light, Diesel models only (no. 26).
In combination with Plug starter switch (no. 28)
This should glow red, showing that the plugs are operating. It should only show a light
red light; should it show a white light, it indicates that one of the plugs is earthed and
this should be remedied without delay.
|
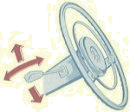
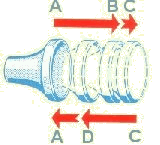
Idling adjustor, Diesel models only (Twist button, no. 27).
By turning this button anti-clockwise the throttle is opened, thereby increasing the
idling speed of the engine. This will be mainly necessary on starting a cold engine until
it warms up. On turning off the engine, before the starter switch is returned to zero
position, this button must be returned clockwise to its original position. It should also
be in this position during normal driving.
|
Plug starter switch, Diesel models only (no. 28).
In combination with starter plug indicator light (no. 26)
This us used to preheat the engine (by the starter plugs), to operate the starter and to
turn off the engine.
 |
4 positions :
(A) Fully home = Engine is turned off.
Pulled out to:
(B) 1st stop = Preheating.
(C) fully out = Starter swicthed on.
Released, returns to (D) = Driving position, in which button remains whilst engine is
running. |
|
Rear seat ventilation (only for the 300SE models).
 Upon special request a rear seat heating
could be installed, the controls of that heating system were placed under the dashboard on
the left-hand side of the driver. It also incorporated several other function levers like
the pull-knob for the air suspension (3) and the handle to release the engine hood
lock (4). Upon special request a rear seat heating
could be installed, the controls of that heating system were placed under the dashboard on
the left-hand side of the driver. It also incorporated several other function levers like
the pull-knob for the air suspension (3) and the handle to release the engine hood
lock (4).
Warm air is led via a blower to the rear seat backrest and rear bench which is then
conducted to the rear legroom. In addition, part of the warm air comes into the car
through openings at the bottom of the rear window.
The output of the blower and therefore also the desired quantity of air can be chosen by
means of the three-stage blower switch (1). The blower is switched on together with
the ingination. If the pull switch is set to two further stages, the blower output is
increased. The heating of the air can be progressively controlled and also switched off
completely with the heating lever (2).
|